Sometimes computer users are unable to find their Windows Movie Maker program on their systems. (NOTE: If you have the new Windows 7 operating system, you DON'T have Windows Movie Maker).
If you have Xp or Vista, and can't find your Windows Movie Maker program, try this:
> Click Start
> Click on All Programs
> Click (or double-click) on the icon if it is listed
If it is not listed:
> Click on Start, Computer, Local Disk (C:)
> Open Program Files folder
> Scroll down and find the Windows Movie Maker folder
> Open it and click (or double-click) on the icon/application
If you still can't find the program do this:
> Click Start(orb)
> In the Start Search space type: MOVIEMK.exe
> Click(or double-click) on the Application
This Blog...
...Provides information on Windows Movie Maker (all versions) and includes tips, tricks, how-to articles and other tid-bits relating to the program.
If you are searching for something in particular, use the Search Blog feature for quick access.
You can find the information you are looking for by clicking on SUBJECTS ---------------------------------------------------->
If you are searching for something in particular, use the Search Blog feature for quick access.
You can find the information you are looking for by clicking on SUBJECTS ---------------------------------------------------->
Movie Maker v6.0 for Windows 7
These are links for the Vista Version of Windows Movie Maker (v6.0)with HD Options:
Windows Movie Maker .exe
Windows Movie Maker v6.0 HD Profiles
Download and install both.
Windows Movie Maker .exe
Windows Movie Maker v6.0 HD Profiles
Download and install both.
Windows Movie Maker v2.6
To download Windows Movie Maker v2.6 (for Vista or higher), click the link below:
Windows Movie Maker v2.6
Windows Movie Maker v2.6
Fix Green Bar issues in Movie Maker
If you are experiencing difficulty with green bars showing up in your Windows Movie Maker projects, visit the link posted below:
Fix Green Bar
Fix Green Bar
Alternative Movie Maker Download
There is other software similar to Windows Movie Maker (designed for Windows XP) that can be downloaded from the link below:
Photo Story 3
Photo Story 3
CCleaner Download
CCleaner is a freeware system optimization, privacy and cleaning tool. It removes unused files from your system - allowing Windows to run faster and freeing up valuable hard disk space.
It also cleans traces of your online activities such as your Internet history. Additionally it contains a fully featured registry cleaner. But the best part is that it's fast (normally taking less than a second to run) and contains NO Spyware or Adware! :)
Cleans the following:
* Internet Explorer
* Firefox
* Google Chrome
* Opera
* Safari
* Windows - Recycle Bin, Recent Documents, Temporary files and Log files.
* Registry cleaner
* Third-party applications
* 100% Spyware FREE
An excellent FREE Computer Cleaning Program!
CCleaner Download
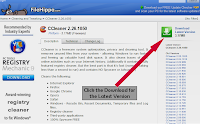
Screenshot of download page (click to enlarge):

For those wanting Windows Movie Maker in a different language, you can download it from the site below:
Windows Movie Maker (Multi-Language) Download
Windows Movie Maker (Multi-Language) Download
Using your Video Converter
A Video Converter is very easy to use once you familiarize yourself with its functions. For demonstration purposes, the Koyote Soft Free Video Converter will be used. It is 'Free' to download (with a license that does not expire).
Converter Download:
Koyote Soft Free Video Converter v2.3
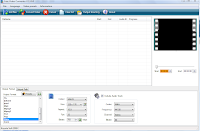
Once you have downloaded the Koyote Soft Video Converter, open the program. The example below is what you should see:
(Click to enlarge view)
Click on Add files from the top menu. This will open up a browse feature. Locate the video files you wish to convert to another format. You can add several files to the conversion program at one time:
Example:
(Click to enlarge view)
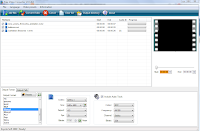
Each of the videos included in the list will have a check-mark beside them. If you decide not to convert a particular video, remove the check from the box. Next, you will need to select the 'Output Format' for the video. The Output Format is the file name extension (format) the video will be converted into. Click to highlight the format you wish to convert the video to.
At this time, you also want to select your 'Output Path', which is where you wish to save the converted files. It is probably wise to save converted video files directly to your desktop where you can find them easily, or a designated folder.
In the visual example below shows three videos to be converted to the .mpeg1 format. The Convert Video button has been selected. The actual conversion process can be seen taking place in the right-side viewing pane:
(Click to enlarge view)
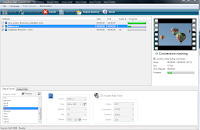
Once the conversion process is complete, the check-marks are removed from the files and the green progress bars show success. Use the Clear List option to delete files and close the program.
Converter Download:
Koyote Soft Free Video Converter v2.3
Once you have downloaded the Koyote Soft Video Converter, open the program. The example below is what you should see:
(Click to enlarge view)

Click on Add files from the top menu. This will open up a browse feature. Locate the video files you wish to convert to another format. You can add several files to the conversion program at one time:
Example:
(Click to enlarge view)

Each of the videos included in the list will have a check-mark beside them. If you decide not to convert a particular video, remove the check from the box. Next, you will need to select the 'Output Format' for the video. The Output Format is the file name extension (format) the video will be converted into. Click to highlight the format you wish to convert the video to.
At this time, you also want to select your 'Output Path', which is where you wish to save the converted files. It is probably wise to save converted video files directly to your desktop where you can find them easily, or a designated folder.
In the visual example below shows three videos to be converted to the .mpeg1 format. The Convert Video button has been selected. The actual conversion process can be seen taking place in the right-side viewing pane:
(Click to enlarge view)

Once the conversion process is complete, the check-marks are removed from the files and the green progress bars show success. Use the Clear List option to delete files and close the program.
Use your instincts when adding Lyrics
When adding lyrics to a WMM (Windows Movie Maker) video project, it's sometimes better to insert the text overlay (in this case lyrics) using your own visual and audio instincts rather than the ‘numeric’ timing method.
Numeric Timing is ‘offset’ by transitions placed into the project – however, the actual offset timing of transitions is not visible in the time-line. Offsets such as this will result in ‘misplaced’ Title(text)Overlays.
The best way to add Lyrics to the time-line is by manually inserting it using your own visual/audio instinct:
> Find the spot on the time-line where you want the lyrics to appear
> Pause the video
> Open Titles and Credits
> Choose: Title on the selected clip
> Type lyric text into the space provided
> Click Add Title
Example(Click to enlarge)
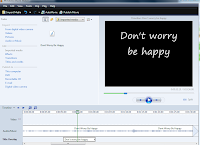
The overlay will appear in the Title Overlay track in the time-line view. Drag it to the spot the project was paused. Click Play in the preview pane. Listen to the audio and make adjustments by dragging the overlay along the track beneath the audio until it fits adequately.
This method will take a bit of fine-tuning and will be more time-consuming but will prove a more reliable method than Numeric Timing calculation alone.
Numeric Timing is ‘offset’ by transitions placed into the project – however, the actual offset timing of transitions is not visible in the time-line. Offsets such as this will result in ‘misplaced’ Title(text)Overlays.
The best way to add Lyrics to the time-line is by manually inserting it using your own visual/audio instinct:
> Find the spot on the time-line where you want the lyrics to appear
> Pause the video
> Open Titles and Credits
> Choose: Title on the selected clip
> Type lyric text into the space provided
> Click Add Title
Example(Click to enlarge)

The overlay will appear in the Title Overlay track in the time-line view. Drag it to the spot the project was paused. Click Play in the preview pane. Listen to the audio and make adjustments by dragging the overlay along the track beneath the audio until it fits adequately.
This method will take a bit of fine-tuning and will be more time-consuming but will prove a more reliable method than Numeric Timing calculation alone.
How to close Windows Movie Maker
If you can't close Windows Movie Maker on your computer, this is what you do:
> Click Ctrl+Alt+Delete
> Click on Start Task Manager
> Under Applications tab, click on Windows Movie Maker and press End Task
> If Windows Movie Maker is not in that list, click on the Processes tab
> Click on Show Processes for all users
> Scroll down to MOVIEMK.exe and press End Process
Example (Click for enlarged view)
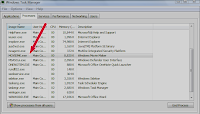
The program will close.
Note:
This procedure can be used for any programs you can't close down manually (and those found running behind Windows).
> Click Ctrl+Alt+Delete
> Click on Start Task Manager
> Under Applications tab, click on Windows Movie Maker and press End Task
> If Windows Movie Maker is not in that list, click on the Processes tab
> Click on Show Processes for all users
> Scroll down to MOVIEMK.exe and press End Process
Example (Click for enlarged view)

The program will close.
Note:
This procedure can be used for any programs you can't close down manually (and those found running behind Windows).
Subscribe to:
Comments (Atom)
